It’s spring and I’m loving up my liver with a break from grains, dairy and coffee. Trouble is amongst the fresh nettles, dandelion greens and burdock in the fridge was a tempting bag of spinach that always begs me to make palak paneer (paneer is cheese and the recipe uses milk).
I knew that I could skip the cheese and substitute the milk with coconut milk, but wondered what in the world could substitute chapatis and rice?!
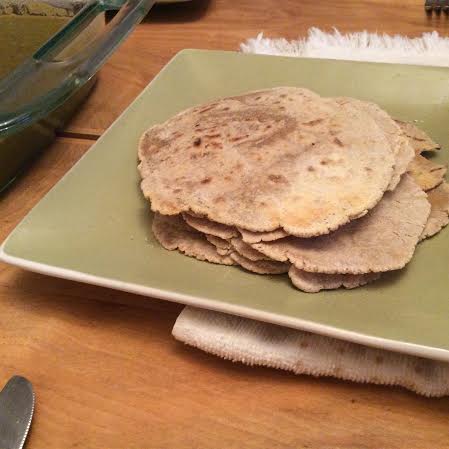
So I searched the net for amaranth chapatis and I found the way (inspired by a religious holiday with fasting where grains are not allowed).
On the fly I created a seed grain pilaf that satisfied me just perfectly to my suprise. I don’t really like any of the seed grains cooked by themselves as a side dish, but put them altogether and wow, it worked!
So if you are grain free, gluten free and dairy free and thought eating Indian would be way off the map, you are in for a real treat!
Enjoy : )
p.s. I didn’t post a picture of the palak as I was experimenting with my new clay oven crock pot which suggests to add more liquid (which I didn’t need to do and it came out soupy, no point in sharing a photo of what it is not going to look like)!
Amaranth Chapatis
What you will need:
1 cup amaranth
water to a consistency that you can roll the dough without it sticking to the rolling pin
How to do it:
1) Mix the water and amaranth by feel (add more flour if you end up accidentally adding too much water)
2) Knead
3) Divide it into 8 peices (to be rolled out)
4) Put a frying pan on the stove at medium high heat (you will have to turn it down if it starts to burn, once you are on a roll I find that somewhere between med and med-high is just right). No need to add any oil.
5) Roll one of your 8 pieces into a ball and roll out as thin as you can without making it too weak (you might want to have flour on your cutting surface, as well as rub it on your rolling pin to prevent sticking)
6) Cook on both sides (they will puff up somewhat just like wheat chapatis, but not quite as much). While the second side is cooking add a few drops of ghee or butter and then turn over and put a bit of ghee on the other side too (I actually skipped this step and it turned out fine).
7) Repeat until they are all cooked and serve with your favourite Indian recipe (ours is Palak Paneer, see variation below).
8) Spread butter or ghee on before serving for more deliciousness!
Here is where I learned how to do it from this lovely granny on youtube in her video demo. This was my first try, hers are much more beautiful!
Seed Grain Pilaf
What you will need: 1/4 cup each of amaranth, buckwheat, quinoa and millet (soak for a few hours or overnight and drain)
2 cups water or broth preferrably
1 yellow onion (sliced in rounds or half rounds)
3 cloves of garlic pressed
2 tsp cumin
2 tsp coriander
1 tsp mustard seeds
pinch of hing 1/4 tsp of tumeric
2 Tbsp unrefined palm oil
1/2 tsp unrefined salt
How to do it:
1) Saute spices in the palm oil until fragrant.
2) Add onions and garlic and saute until translucent.
3) Add rinsed seed grains and unrefined salt and then bring to a boil.
4) Simmer until cooked.
Enjoy on the side of dahl, stews etc.
Crockpot Spinach Palak
What you will need:
1 large bag of fresh spinach
1 large yellow chopped roughly
2 med. fresh tomatoes, quartered
2″ piece of fresh ginger root grated
6 cloves of garlic, peeled
2 Tbs. ground cumin seed
1.5 tsp. red chile powder
1 tsp ground turmeric
2 tsp garam masala (optional)
1 tsp unrefined salt
1 Tbs butter or ghee
1/2 cup coconut milk
How to do it:
1) Layer in a crock pot
2) Cook and stir half way through desired cooking time (depending on your crock pot and whether you are cooking on high or low)
3) Once it is done, puree in a blender
Not to be confused with whey protein powder (which is basically the dry concentrated form), whey is the watery ‘stuff’ you’ll find sitting on top of your whole plain yogurt.
While it is best know for being a starter culture for home made cultured veggies and condiments, whey has health benefits all on it’s own!
Here are some of the health benefits of using whey:
Minerals
Protein
1 tbsp of whey in a glass of water with or before meals will help digestion
Use ¼ cup whey in a glass of water with a pinch of unrefined salt for better water absorption
Keeps joints movable and ligaments elastic
“For stomach ailments, 1 tbsp 3 times per day will feed the stomach glands and they will work well again” (Hanna Kroeger in Ageless Remedies from Mother’s Kitchen)
Wondering what else you can do with it?
Substitute it in any recipe that calls for water or milk (such as salad dressings, sauces, muffins, bread, pancakes etc.)
Instead of milk in smoothies.
To soak grains, lentils and beans for better digestibility.
Use it to cook your grains, pasta, rice or oatmeal with.
Use it in soups or stew when you don’t have broth.
Use it to marinate your meats for better digestibility.
Feed it to your plants.
Compost it!
Click here to learn how to make some for yourself!
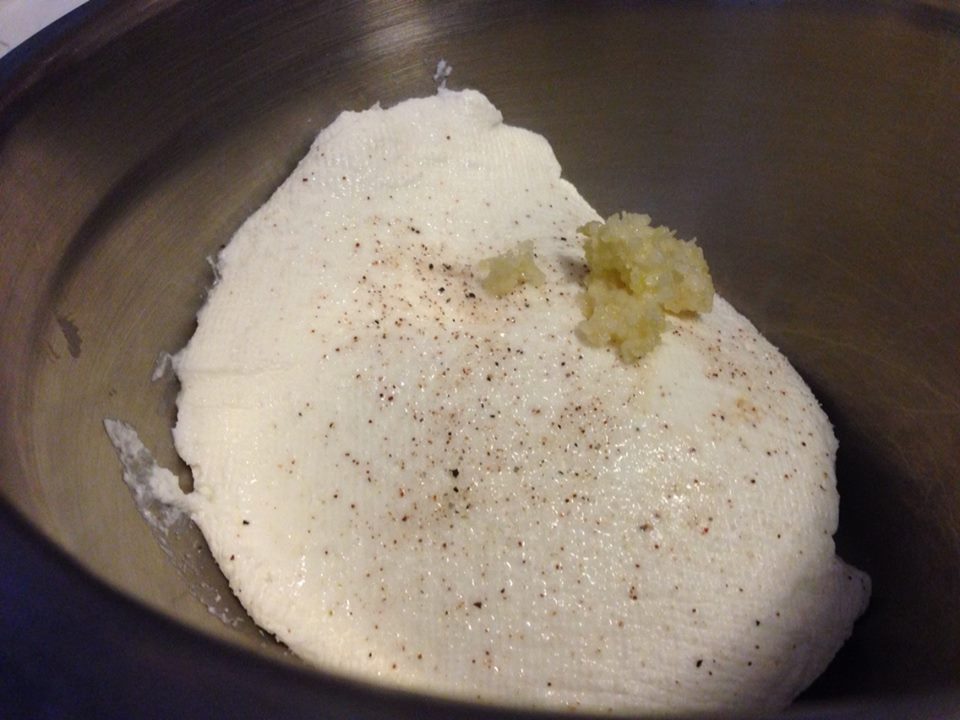
Step 2: Stir in a ½ tsp or more of unrefined salt and garlic to taste and fresh herbs of your choice (if you have some on hand).
Step 3: Roll into balls and drop into a 500ml jar.
Step 4: Pour olive oil on top.
Step 5: Store in the cupboard or on your countertop.
Enjoy by scooping out balls as a side dish or spread on bread or crackers!
When you are done, strain the olive oil with a coffee filter and use to make salad dressings (no need to let it go to waste)!
The finished product does not need to be refrigerated as the olive oil will act as a preservative. The longer it sits, the more sour it gets, so if you don’t love the sour taste, then make sure to consume it within 3-5 days. Honestly in this house, we never make it to day 3!
This recipe is great to wow a crowd at potlucks or to gift to family and friends for the holidays. 1 quart of yogurt will make two small jars (as shown in the photo).
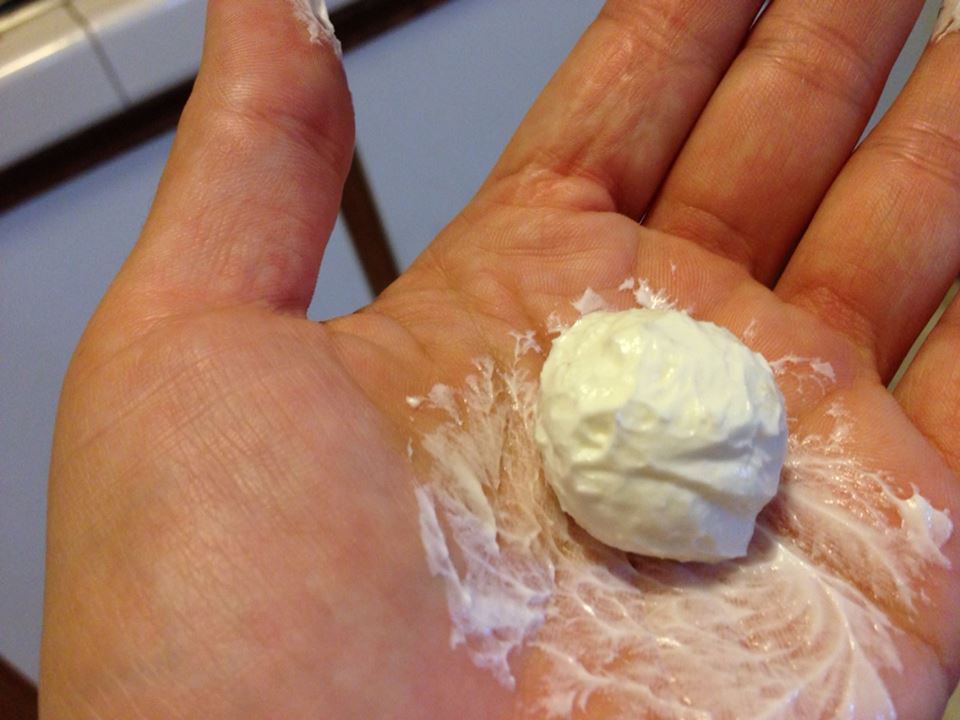
Cream cheese is nice, but yogurt cream cheese is even better (and FREE of nasty additives)!
What you will need: plain full fat yogurt
a cheesecloth or nut milk bag (or you can use a tea towel).
optional: unbleached coffee filter
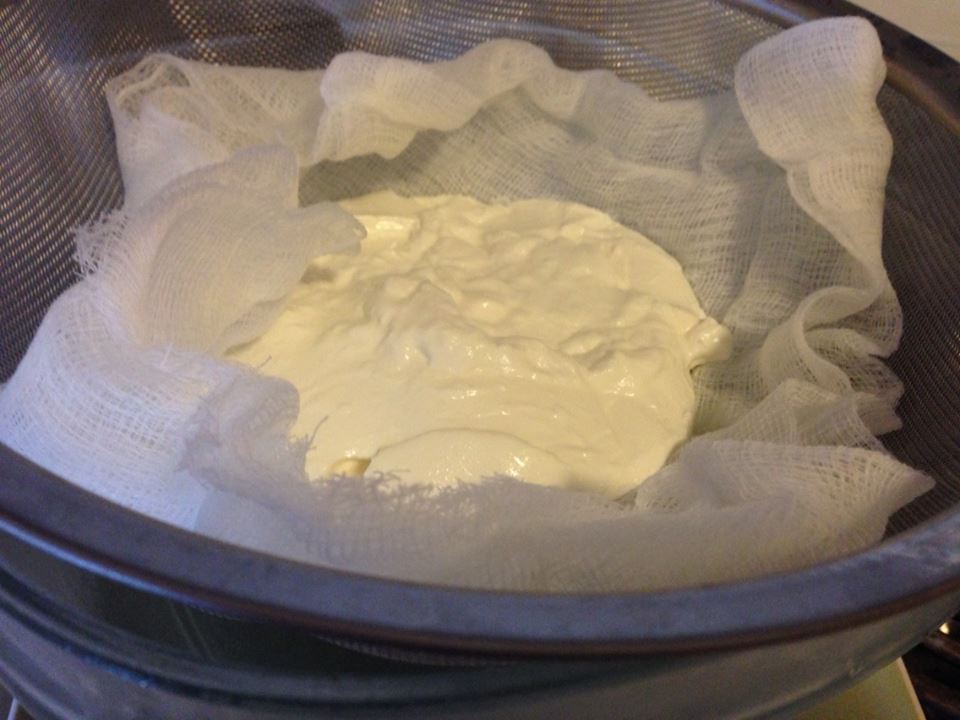
Grab a medium sized bowl, your nut milk bag (or cheese cloth) and the yogurt. Pour the yogurt into the nut milk bag (or put a strainer over the bowl if you are using a cheesecloth). The liquid portion of the yogurt is the whey and it will begin to drip through into the bowl.
You will need to hang your bag over the bowl so that the process can occur over a period of 4-8 hours (depending on the texture you want your yogurt cream cheese to have). When I use cheesecloth and a strainer, I actually let the strain happen for a few days inside the fridge.
* To make sure that no milk solids have dripped through, do a second strain with a coffee filter as shown in the photo below.
Keep the whey and the cream cheese in separate glass containers and store in the fridge.
The cream cheese will last from 5-7 days and the whey will last for up to 6 months!
You will use the whey to culture your ferments.
You can use the cream cheese to spread on toast, to make cheesecake, cream cheese icing or whatever you normally use cream cheese for. Mmmmm…..imagine probiotic desserts!! A whole new realm of guilt free pleasure is available to you!!
Wondering what else you can do with your cream cheese?
Did you know that sodium fluoride is an industrial waste by-product of aluminium and phosphate production? The sodium fluoride that is added to city water is surpassed only by Cyanide of Mercury in toxicity to human physiology.
In the 1920’s and 30’s, lawsuits and health officials forced companies to install pollution control devices to trap fluoride waste. These companies began to sell sodium fluoride as rat and insect poison. Eventually, it was marketed to prevent tooth decay which explains why consuming a 7 ounce tube of toothpaste is enough to kill a 20lb infant or child!
Few know that one of the least of fluoride’s side effects can be fluorosis, a mottling or pitting of the teeth, which is dismissed by most official organizations as being a “cosmetic” issue, even though children with dental fluorosis have also been found to have lower IQ’s and other bone structure disturbances.
And yet according to The Canadian Dental Association states that, “Where fluoride has been added to municipal water supplies, there has been a marked decline in tooth decay rates” and “Children need fluoride protection while their teeth are developing”.
So what gives?
Isn’t fluoride a necessary and health promoting mineral for the elastic fibers of the skin, the muscle tissue and the surface of the bones and teeth Yes, it is true that fluoride plays a role in healthy teeth and bones, yet sodium fluoride (the chemical waste by-product) and calcium fluoride (the fluorine found in naturally in food) are not the same.
Sodium fluoride is absorbed by organs and body systems, notably, the skeletal system and there is evidence of elevated risk of bone fractures, degenerative bone disease and bone cancer in fluoridated areas over non- fluoridated ones. And that is just the tip of the ice burg.
For more info on the side effects and on hidden sources of fluoride (besides dental care) please see www.fluoridealert.org.
While several studies have shown that the rates of dental decay declined after fluoridation, the CDC neglected to mention that dental decay rates also declined
in non fluoridated areas and were declining before mass fluoridation occurred (you can view CDC graphs which show this at aforementioned website).
The issue is not with fluoride, but with the form of flouride. You can strengthen your bones and teeth naturally with the calcium fluoride, found in nature, in the way you were meant to ingest it- through food!
Naturally rich fluorine rich foods are:
Cauliflower
Sauerkraut
Chinese Cabbage
Red and Green Cabbage
Goat’s milk
Seaweed
Rice
Rye
Parsley
Avocados
Cabbage
Black eyed peas
Herbs:
Juniper Berries
Licorice
Lemon Grass
Bancha tea twigs
If you or you or someone in your family is suffering from dental decay, there is a calcium fluoride supplement available as a homeopathic tissue salt called “Calc. Fluor.” Homeopathic products are non-toxic and safe for use on children.
My own son had a little cavity in between his two front baby teeth to which the dentist sent us home with topical fluoride to apply at home with instruction to come back in three months. And of course, being the hippy momma I am, I didn’t use it and looked for an alternative instead. Simply, each time we brushed his teeth, we also gave him a dose of the tissue salt Calc Flour.
When we returned to the dentist’s office, he said, “you’ve been using the fluoride faith fully haven’t you?”, while he carefully examined my son’s teeth. I said no, I’ve been using a homeopathic dose of calcium fluoride. After his eyes went blank for a brief second, he said ok, well come back in six months and we’ll keep our eye on it. Well we came back for 4, 6 month intervals, after which I decided to stop bring him, because the tooth had long since stopped decaying after our initial 3 months of taking calcium fluoride (since the cavity was in a very visible location, it was obvious to the naked eye, whether or not it was decaying further).
Wondering where you can purchase fluoride free toothpaste?
Most health food stores carry fluoride free toothpaste. Avoid tap water that has been fluoridated and if at all possible, avoid distilled water too (as it leaches minerals that your body would otherwise use to build your teeth!). A good alternative to fluoridated tap water is natural spring water bottled at the source, as it is clean and retains minerals that are naturally contained within it.
Fluoride filters for tap water are also available @ www.gtawater.com
References:
Frye. A., Holistic Midwifery-A Comprehensive Textbook for Midwives, Labrys Press Portland, Oregon, 1998, pp. 280-281.
Kroeger. H., Instant Vitamin-Mineral Locater. self-published, 1972.
Schuessler. W.H., Biochemic Handbook. Plantscan Publications, St. Edmunds, Suffolk, 1998
Crowe, D., The Fluoride Fiasco, www.alivepublishing.com
Pitchford, P., Healing With Whole Foods, North Atlantic Books, Berkeley, California, 2002.
I have a strong preference for breakfast’s that can be pre prepared the night before so that I can get my kids off to school on a full tummy -without rushing. This recipe is soooo easy, you’ll have no trouble making it while cleaning up from dinner : )
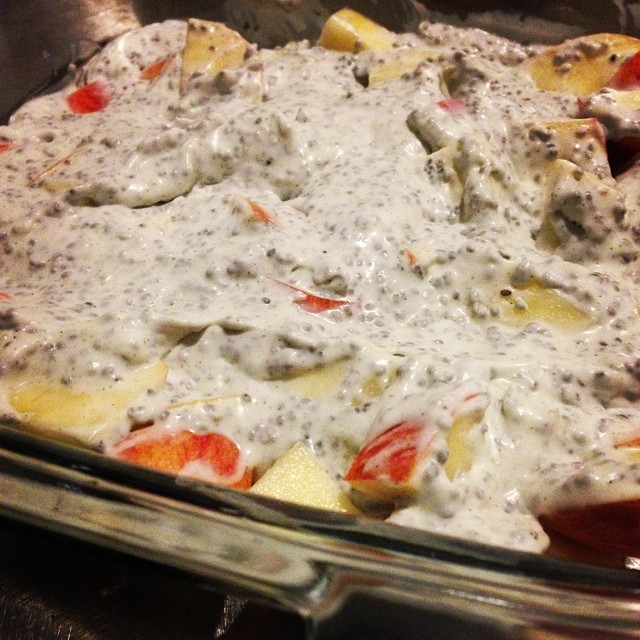
Apple Chia Breakfast Casserole
What you will need:
4 apples
1/4 lemon squeezed
1 cup canned coconut milk
4 tbsp chia
1/4 tsp green leaf stevia (or only slightly more to taste)
How to do it:
Step 1: Cut apples into bite sized pieces and layer into the bottom of a casserole dish.
Step 2: Squeeze some fresh lemon juice and pour over the apples to keep them from browning (use a fork to distribute the juice evenly).
Step 3: In a seperate bowl, mix coconut milk, 4 tbsp chia and 1/4 tsp of stevia.
Step 4: Spread the chia mixture over the apple base and refridgerate for breakfast the next day.
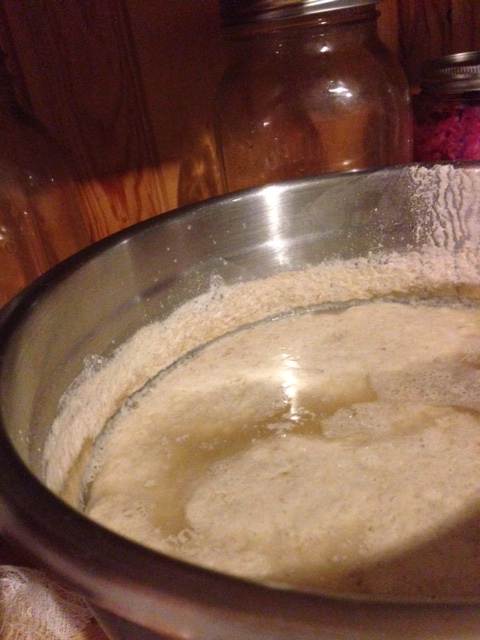
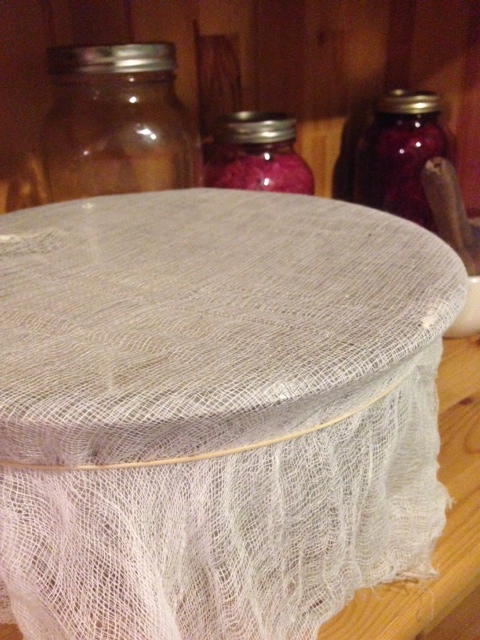
Making a sourdough starter is really easy! All you have to do is mix flour and water and let the beneficial yeasts naturally found in the air culture your starter by falling through a cheesecloth.
How to Make a Sourdough Starter
What you will need:
flour
filtered water
cheesecloth
How to do it:
Step 1: Mix 1 cup spelt flour with 1 cup of water in a bowl, cover with cheesecloth and leave on the counter at room temp.
Step 2: Every day after that, ‘feed’ the starter with 1 more cup of flour and water (always covering with a cheesecloth)
Step 3: At approximately day 5 your start will bubble up (but it is not ready yet)
Step 4: When your starter looks ‘flat’ again, it is ready.
*Where people often get confused and throw out a perfectly good starter is when they don’t see it bubble and assume that it didn’t work! Don’t assume that just because you didn’t take a peak when the bubbles were active, that doesn’t mean that you don’t have a successful starter!
After about 5-7 days (depending on how warm your kitchen is- the warmer, the faster), your starter should be ready. If you didn’t see the bubbly hours, follow your nose. When you start to smell that delicious yeasty smell, then your sourdough mama is ready!
Step 5: Once your sourdough starter is ready, you can now cover it with a regular tea towel.
Step 6: Preserve your starter by feeding it every day (1 cup water, 1 cup flour), still keeping it on your countertop.
*or if you don’t plan to use it that often, refrigerate it and ‘feed’ it once a week in the fridge.
Note: If the kids start to complain that your starter is too sour, every time you feed it, pour off the water that settles at the top (consider that pouring off the sour) and ‘feed’ it 1 cup of flour and 11/2 – 2 cups water (keeping it the consistancy of a thick blended soup).
I prefer oven pancakes because they are easier, faster and more nutritionally dense than a regular pancake because there are more eggs in the recipe. And in this case with sourdough as the base, they are easier to digest too : )
This recipe is kid approved!
Spelt Sourdough Oven Pancakes
What you will need:
2 cups sourdough starter
6 eggs
1 tsp unrefined salt
How to do it:
Step 1: Pre heat the oven to 400 degrees F
Step 2: Put 2 cups starter in the blender, crack 6 eggs ontop and sprinkle in the unrefined salt and blend until smooth.
Step 3: Generously grease an oven safe casserole dish with butter, ghee or coconut oil and pour batter in.
Step 4: Bake for 12 min.
Serve with maple syrup/ jam and creme fraiche/butter/yogurt on top!
With our sweet little bundle arrived, it can suddenly feel urgent to create a brand new world for our children to live into. Seemingly strange, motherhood simultaneously kicks our drive to make a difference into high gear, while at the same time putting our foot on the brake -with the round the clock responsibilities of motherhood.
While both of my children are now in school I must admit that throughout my 10 years as a stay at home mom, whilst fully engaged with my passions -I often felt perplexed by my seemingly contradictory urges to fully embody my role as a nurturer and at the same time fulfill my dreams, passions and purpose as a woman.
It was a conflicted time for me as I lived with the story that my work compromised my mothering and that my mothering compromised my work. I often felt like I wasn’t doing a very good job of anything. Unable to give myself fully to either and in many ways living only to a fraction of my capacity.
Sigh.
But a story is all that it was. A collective pattern and mindset (one that I believe is part of the collective feminine pain body) bullying us into believing that we can’t have it all (and shouldn’t). Battering us into believing that we are required to give our selfhood over to motherhood and simply put our lives on hold- if we are to be a good mother.
It’s bruising and it’s a lie.
I believe the truth is that we are called as mothers to gather resources and do whatever it takes to conjure up more energy (than we’ve ever had) and to give more fully of our whole selves. We are called to model living fully self expressed in the truth of who we are, so that our children can naturally and easily do it too.
It is a truth that my husband gently reminds me of, when I feel guilty for swinging too far from a lifestyle that I personally feel is in the best interests of my family- and yes, of course there are seasons like that when you dare to defy the traditional role of a mother- you’ll feel like a shit mom, and sometimes you’ll be one- despite your best intentions you are only human and we are all learning as we go.
While it isn’t always easy, it is worth figuring out how to live harmoniously and in consensus with both our soul’s drive to create and our children’s inherent needs. I believe that we are the ones who will recreate the story and create a new blueprint for motherhood.
We are finding our way….
Feelings and urges are meant to be expressed, not suppressed (the latter of which of course which only adds fuel to the fire of the passions we are trying to put out or starve).
By virtue of having a desire, our soul is speaking to us of a yet unmet need. You can’t argue with a feeling, it just is. It must be felt, acknowledged, released or expressed. Either way, it is coming out- whether destructive or creative. We get to decide -if we choose to look at it.
And you can’t argue with reality either. If it is universal that women give birth to creative power, while also giving birth to a child (many women can attest that this heightened creativity begins as early as pregnancy), then could it be that we are wired this way for good reason?
Who better than a mother high on love hormones to recreate the world?
Is it possible that it is within the divine plan, that a strong desire to manifest is also birthed inside a woman as she becomes a mother? Could our creative urges be divinely inspired?
With all of my being, I believe that childbirth is a woman’s vision quest and that not only are we downloaded with a blueprint for how we are to parent, but that we are also given a vision for birthing a new humanity through mothering.
This inner drive need not be misconstrued as a force that calls us away from conscious mothering, but rather acknowledged as one that calls us more fully into mothering with intention and living our divine life purpose (of which motherhood is part of the practice).
It is all how you look at it.
In the famous words of Wayne Dyer, “when you change the way you look at things, the things you look at change”.
How would you live differently if you thought of motherhood as the catalyst for your calling?
Want to make meatballs without the breadcrumbs? Then let me introduce you to nutritional yeast! Nutritional yeast is cheesy flavoured vegan superfood that not only stands in for cheese, but it also has a salty flavour.
Nutritional yeast is high in B-vitamins, chromium and natural glutamic acid (which make is a great superfood for those struggling with fatigue, alcoholism and sugar cravings).
Cheesy Meatballs
Makes 40 meatballs
What you will need:
1 lb ground beef
1 medium egg (whisked in a bowl)
4 garlic cloves, minced
3/4 cup fresh parmesan cheese, grated
1/3 cup nutritional yeast
1 1/2 teaspoons salt
1-2 Tbsp honey
1 tablespoon Worcestershire sauce (optional)
3 Tbsp prepared mustard (optional)
1/8 tsp basil (or 1 tsp fresh chopped)
1/4 tsp oregano (or 2 tsp fresh chopped)
1 tsp parsly (or 1/4 cup fresh chopped)
1 Tbsp onion powder
1 teaspoons anise seeds (optional)
2 Tbsp yogurt or cream (more or less depending on the texture thus far- will depend on how many optional ingredients you include)
How to do it:
Step 1: Mix all ingredients together in a medium sized bowl and then shape into small meatballs.
Step 2: Drop the meatballs into a simmering sauce (I simple opened a can of tomatoe sauce and mixed with cream to extend it into two pots, but you can use your favourite cream or tomatoe sauce) and allow to continue simmering for 10-12 minutes.
Step 3: Turn meatballs over and simmer for another 10-12 min (or until meatballs are cooked through). If your sauce starts to evaporate off too much then add broth, cream or water to extend it.

 What you will need:
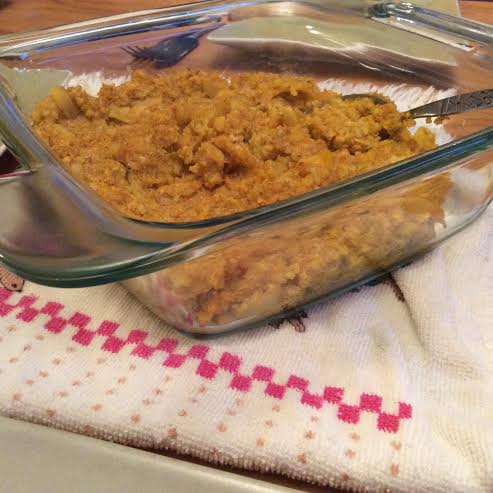 1/4 cup each of amaranth, buckwheat, quinoa and millet (soak for a few hours or overnight and drain)